
Well, can you find it in there?
As usual, the bike work picked up a bit in the colder weather but dropped off as soon as it got warmer. We started cycling earlier this year so that and the other hobbies(mainly vintage racing bicycles) have kept me distracted. My fiance was in a cycling wreck recently and required surgery. Linda and I will be married in August and then be off to Italy for a while(cycling a bit I'm sure......... or I'm leaving!) Not sure if I'll get time to do much to it before then.
I have started getting e-mails about the project and I see why. I googled "board track racer replica" and my blog was the 4th listing. Trust me, I still want to see this beast finished so all is not lost. Anywho, I did end up finishing the kickstand and purchased a used B&S Vangaurd V-twin engine last fall. The project is currently displayed, bachelor-style, in my dining room(see above). It has been buried by a few vintage lightweight race bikes(other current hobby) and has gotten little attention.
As for the progress before the break.... here are a few pics of the front fork:


Here is a closeup of the front truss mount. I have seen a few similar to this on antique bikes but I still like the idea of a tripple tree.
The kickstand:

When not in use, it folds up and will lay under the seat. On the old factory road bikes, they would usually clip to the back of the fender

A little about the motor I'm using. I really wanted a twin, and if I couldn't be authentic in appearance, I'd be authentic in theory. I found a 12HP Vangaurd(read bulletproof!) on the local CL and decided that was it. The rear hub will not likely take that torque so I'm leaning toward a MTB hub, using the disk brake holes to mount a sprocket. That will be a project in itself. I also bought a Comet 40 series torque convertor and will need to fab a jackshaft mount onto the seat tube.
The twin was stripped of it's shrouds and what wasn't needed was removed completely. The electric start is a nice option that might have to stay! Of course, that will necessitate hiding a battery, etc. I have a trick or two in mind for that. I'm looking forward to fabricating pipes and such for it. The more I type, the more I realize how much there is to do. Depressing!


I ran the motor on the ground and I like the twin sound.
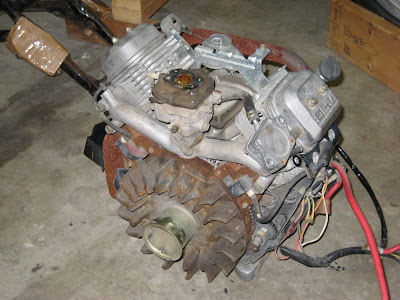
That flywheel sure is ugly, heavy, and dangerous. I need to think of a vintage looking shroud if I want to keep my pretty shins! There is a growing support network for racing these twins and racing parts are out there. Should I bother with a different flywheel? I think 12HP is way more than I need anyway so why add a bunch of billet shiney stuff and introduce a bunch of tuning woes? Just keeping it upright will be enough work!
Here's the motor in the frame. Can you say wide?! Looking like a chopper build! I will of course create an oil filter bypass and remove that.


This bike is starting to look really uncomfortable! Thanks to those following along. Keep prodding me to finish!
Dave
 Most board track tanks are fairly simple. Some of the early ones were basically riveted boxes, others nicely contoured and soldered. Many early tanks contained a separate oil tank within them - some with oil on one side and fuel on the other.
The Cyclone was simple in appearance but does have several unique curves. I mocked this up in hard cardboard(not corrugated) and a glue gun. Plenty of gussets keep it from flexing - important when trying to take measurements or fit a piece over a weird angle. In the end what this does is allow you to see the shape in 3D. Once the shape is acceptable, you can make templates by laying paper over the tank, adding creases, etc. to conform to the curves. Once unfolded, these templates allow you to see the shape needed in steel. The folds will show where shrinking and/or cuts should be made. This is just basic pattern making. You can also use the "buck" you just made to trial fit some of the new pieces although a buck is typically hardwood and would be used to form the metal. All in all, this tank won't require lots of shrinking or forming. A little rolling of a few parts is all that will be needed.
These tanks were primarily long and skinny. Adding a baffle or two in there will help prevent sloshing fuel from upsetting the bike. Baffles would also limit cavitation at the stopcock when a low fuel level shifts around. Baffles could also limit flow a bit in a rupture situation(God forbid). It's unlikely that I would ever fill the tank completely but remember, 2 1/2 gallons of fuel is about 20lbs and if you have ridden lightweight motorcycles you know that a full tank can be felt by the rider. It's good practice to build it properly rather than doing just what's needed to get by. JMO
I have also revisited the seat idea. The Mesinger "Motorcycle Racer" is the quintessential board tracker seat and maybe the most attractive but I am finding more and more examples that didn't use it. The picture below is of the Michaelson racing team(c. 1912-1914). These bikes are all wearing what looks like compound sprung saddles. I don't know the production years of the "Racer" seat so perhaps it wasn't even available at the time. Certainly it wasn't the only option. Brooks, in fact, made saddles, bags, and even rifle clips for motorcycles at times issueing separate catalogues for bicycles and motorcycles. They even list saddle models made for "speed work". If you are interested, go to http://www.brookssaddles.com/brooksengland.html
These are pdf versions of most of Brooks old catalogues! Check out some of the options. Really cool stuff. The Mesinger isn't absolutely necessary and, based on these findings, I might feel justified to venture into another easier option. The proper look is still imperative so no everyday Schwinn seat will do.
Most board track tanks are fairly simple. Some of the early ones were basically riveted boxes, others nicely contoured and soldered. Many early tanks contained a separate oil tank within them - some with oil on one side and fuel on the other.
The Cyclone was simple in appearance but does have several unique curves. I mocked this up in hard cardboard(not corrugated) and a glue gun. Plenty of gussets keep it from flexing - important when trying to take measurements or fit a piece over a weird angle. In the end what this does is allow you to see the shape in 3D. Once the shape is acceptable, you can make templates by laying paper over the tank, adding creases, etc. to conform to the curves. Once unfolded, these templates allow you to see the shape needed in steel. The folds will show where shrinking and/or cuts should be made. This is just basic pattern making. You can also use the "buck" you just made to trial fit some of the new pieces although a buck is typically hardwood and would be used to form the metal. All in all, this tank won't require lots of shrinking or forming. A little rolling of a few parts is all that will be needed.
These tanks were primarily long and skinny. Adding a baffle or two in there will help prevent sloshing fuel from upsetting the bike. Baffles would also limit cavitation at the stopcock when a low fuel level shifts around. Baffles could also limit flow a bit in a rupture situation(God forbid). It's unlikely that I would ever fill the tank completely but remember, 2 1/2 gallons of fuel is about 20lbs and if you have ridden lightweight motorcycles you know that a full tank can be felt by the rider. It's good practice to build it properly rather than doing just what's needed to get by. JMO
I have also revisited the seat idea. The Mesinger "Motorcycle Racer" is the quintessential board tracker seat and maybe the most attractive but I am finding more and more examples that didn't use it. The picture below is of the Michaelson racing team(c. 1912-1914). These bikes are all wearing what looks like compound sprung saddles. I don't know the production years of the "Racer" seat so perhaps it wasn't even available at the time. Certainly it wasn't the only option. Brooks, in fact, made saddles, bags, and even rifle clips for motorcycles at times issueing separate catalogues for bicycles and motorcycles. They even list saddle models made for "speed work". If you are interested, go to http://www.brookssaddles.com/brooksengland.html
These are pdf versions of most of Brooks old catalogues! Check out some of the options. Really cool stuff. The Mesinger isn't absolutely necessary and, based on these findings, I might feel justified to venture into another easier option. The proper look is still imperative so no everyday Schwinn seat will do.


